Wow, Do you want to know how to start Android app development? I knew it, your answer is yes, but you don’t know-how. This entire post is for you. It will help you to start your Programming adventure as an Android developer.
Let me tell you what are the basic requirements to develipe your first Andoid App. Yes, I know you are exited now. So, Lets see-
- Android Studio IDE (Integrated Development Environment)
- SDK (Software Development Kit)
- JDK (Java Software Development Kit)
- Virtual device or any Smartphone
Virtual device or any mobile phone to test on the application. So all this takes work to set up now.
I am sure, by after reading this android app development tutorial you can create your first Android app.
What Android Development Includes
Learn the platform, not only the language
Android development is the process of designing, coding, testing, and distributing applications for Android devices. It includes user interfaces, lifecycle behavior, storage, networking, permissions, accessibility, performance, and release preparation. A beginner does not need to learn everything before creating a first screen, but it helps to understand how the pieces fit together.
Current Android learning material commonly uses Kotlin and modern Android libraries. Java is still useful when maintaining older projects or reading existing code. Choose one primary language for practice and learn the platform concepts alongside it.
Start with a small project
A first app should solve a small problem: a counter, checklist, timer, note screen, or simple converter. Small projects provide a complete cycle from interface to code, testing, and debugging. A huge social network idea usually creates too many unknowns before a beginner understands the build process.
Install Android Studio and the SDK
Use the official development environment
Android Studio is the official IDE for Android app development. It provides a code editor, project templates, a Gradle-based build system, an emulator, testing tools, debugging tools, and inspections that can highlight compatibility, usability, and performance problems.
Download Android Studio from the official Android Developers site and follow the setup wizard. Allow it to install or locate the SDK components requested by the project. The exact screens can change between releases, so follow the current installer instructions rather than an old screenshot from a tutorial.
Check the SDK configuration
After installation, open the SDK Manager and confirm that the platform and build tools required by your project are available. A project can fail before your code runs when a required SDK package is missing. Read the Gradle error carefully; it often names the component that needs attention.
Choose Kotlin or Java
Why Kotlin is a practical starting point
Kotlin has concise syntax, null-safety features, and strong Android tooling. It can reduce repetitive code in small examples, but beginners should still learn variables, functions, classes, collections, control flow, and error handling rather than copying snippets without understanding them.
Where Java still helps
Many existing Android applications and tutorials use Java. Basic Java knowledge helps when reading a legacy codebase, comparing older APIs, or working with a team that maintains Java modules. Do not mix languages in a first project just to appear advanced; learn one clearly and add the other when a real task requires it.
Create Your First Android Project
Choose a simple template
Open Android Studio, choose a new project template, enter an application name, select a package or namespace, and choose the language and minimum platform settings offered by the current wizard. A modern template may use Jetpack Compose, while a view-based template uses XML layouts. Either approach can teach the essential development cycle.
Choose a minimum platform deliberately. Supporting more older devices can impose compatibility work, while choosing a newer platform can exclude devices. For a learning project, keep the wizard's suggested value unless you have a specific reason to change it.
Understand Gradle files
Gradle builds the application and resolves dependencies. New projects may use Kotlin-based Gradle scripts with the .gradle.kts extension, while older projects may use Groovy scripts. Do not paste configuration from an unrelated tutorial without checking the Android Gradle Plugin and language versions used by your project.
Understand the Android Project Structure
Manifest, source, and resources
An app module normally contains a manifest, Kotlin or Java source files, and a res directory for resources such as strings, images, colors, and layouts. The manifest describes important application components and permissions. Source files contain behavior, while resources keep reusable presentation data separate from code.
- manifests: application metadata and declared components.
- kotlin+java: Kotlin, Java, and test source files.
- res: strings, images, layouts, icons, and other resources.
- Gradle scripts: build settings, plugins, dependencies, and variants.
Keep user-facing text in resources
String resources make it easier to translate and maintain an application. Avoid scattering visible messages through source files. Give controls useful IDs or semantic labels, and do not use a generated ID as the only explanation of what a view does.
Build a Simple First Screen
View-based example
A view-based project can use an XML layout containing a text label and a button. The Activity loads the layout, finds the button, and responds to a click. The older example in this post uses a support library class; a current project should use the dependencies and Activity class selected by its template.
class MainActivity : AppCompatActivity() {
    override fun onCreate(savedInstanceState: Bundle?) {
        super.onCreate(savedInstanceState)
        setContentView(R.layout.activity_main)

        findViewById<Button>(R.id.show_message).setOnClickListener {
            Toast.makeText(this, "Welcome to Android", Toast.LENGTH_SHORT).show()
        }
    }
}
Compose alternative
Jetpack Compose describes the interface in Kotlin instead of using an XML layout for every screen. A beginner can learn the same ideas—state, events, text, buttons, and navigation—through composable functions. Start with one approach, then compare the other after the first project works.
Run the App on an Emulator or Phone
Use a virtual device
The Android Emulator lets you run an app without a physical phone. Create a virtual device with a suitable screen size and system image, start it, and choose it from the run configuration. The first launch may be slower while the virtual device prepares its data.
Use a physical device
A real device can reveal touch, battery, camera, notification, and performance issues that are easy to miss in an emulator. Enable the developer options and USB debugging according to the device instructions, connect it securely, and accept the debugging authorization prompt. Only use devices and computers you trust.
Learn Android Fundamentals
Activities, lifecycle, and state
An Activity represents a user-facing entry point, but its lifecycle can change when the device rotates, another screen appears, or the app moves to the background. Do not assume that an Activity object remains alive forever. Store important state using the appropriate Android architecture tools and avoid putting long-running work directly on the main thread.
Intents, resources, and permissions
Intents help components request actions or navigate. Resources keep presentation data organized. Permissions should be requested only when the feature needs them, with a clear explanation to the user. Treat data from other apps and network responses as untrusted and validate it before use.
Debug and Test a Beginner App
Use Logcat and breakpoints
Logcat can show runtime messages, crashes, and stack traces. A breakpoint pauses execution so you can inspect values and follow the path that produced a problem. Read the first useful line of the stack trace, not only the final screen message.
Test more than one screen
Check portrait and landscape layouts, different text lengths, dark and light themes, slow network conditions, and an empty state. A screen that looks correct with one short English label may fail when text grows or a user increases the system font size.
Use inspections
Android Studio inspections and lint can identify possible performance, accessibility, compatibility, and correctness issues. Treat warnings as questions to investigate. Do not silence a warning just to make the panel look clean.
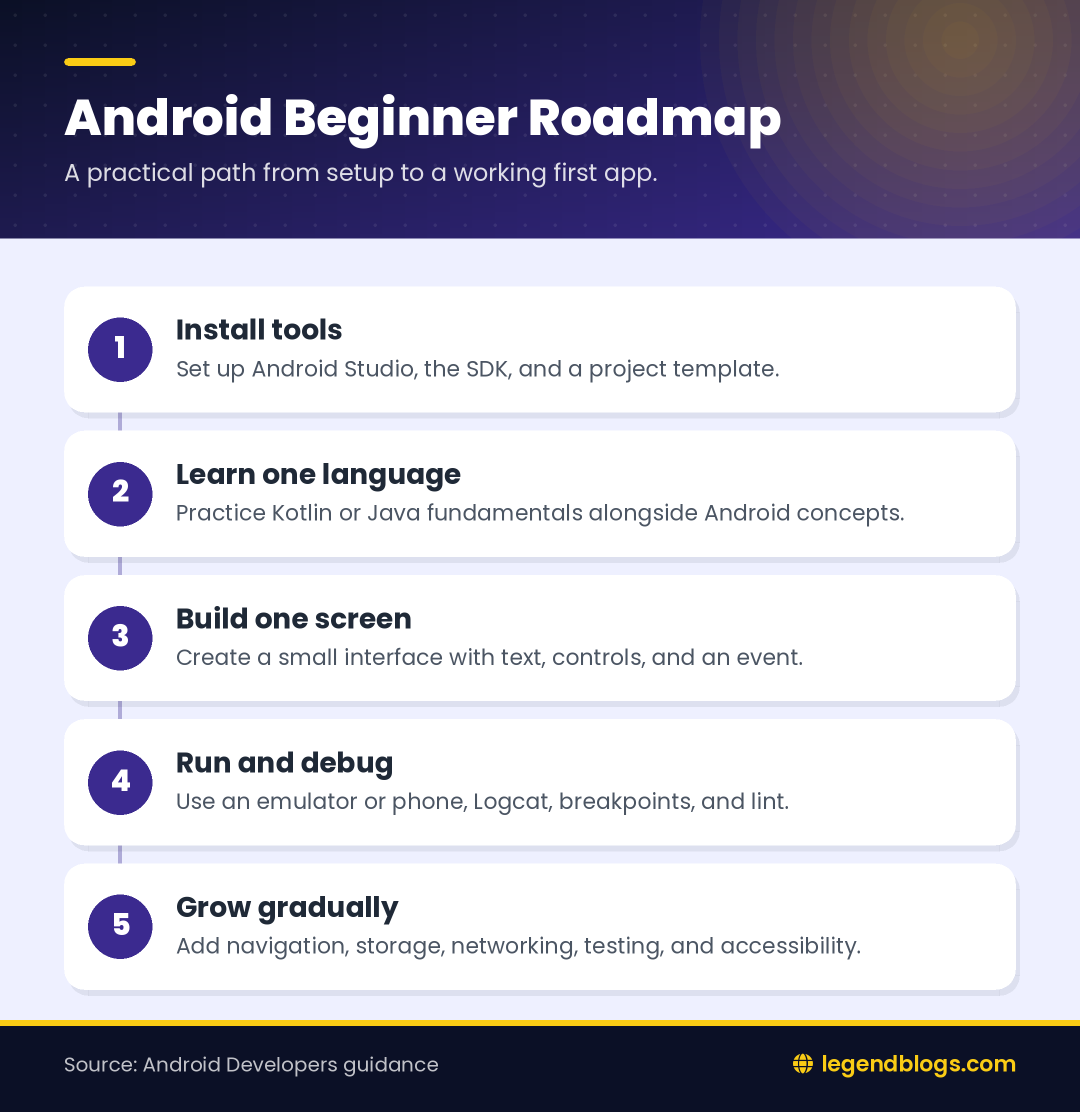
Create a Practical Learning Plan
Build in stages
- Learn Kotlin or Java fundamentals.
- Create a static screen and respond to a button event.
- Add multiple screens and basic navigation.
- Store simple data locally.
- Call a safe test API and handle loading and errors.
- Add tests, accessibility checks, and release configuration.
Read official examples
Use Android Developers training, codelabs, API references, and sample projects to learn current patterns. Compare the date and tool versions of third-party tutorials before copying a Gradle file or dependency. When an example fails, understand why instead of repeatedly changing versions at random.
Common Beginner Mistakes
- Copying old support-library imports into a new project.
- Doing network or heavy file work on the main thread.
- Ignoring lifecycle changes and losing screen state.
- Requesting permissions before explaining the feature.
- Testing only on one device size.
- Hard-coding visible strings and dimensions.
- Adding many libraries before understanding the platform APIs.
FAQ
Is Android development difficult for beginners?
It has several concepts, but a small project makes the learning path manageable. Learn one language, create one screen, run it, and add one feature at a time.
Should beginners learn Kotlin or Java first?
Kotlin is a practical choice for new Android practice, while Java remains valuable for existing projects. Choose one and learn its fundamentals well.
Do I need Android Studio to build Android apps?
Android Studio is the official and most complete environment for normal Android development. It bundles the tools most beginners need to create, run, inspect, and test an app.
Can I learn Android development without owning a phone?
Yes. The Android Emulator can run an application on a computer. A physical device is still useful later for testing real hardware behavior.
How long does it take to build a first Android app?
A small first screen can be built quickly once the tools are installed. The time needed to become comfortable depends on your programming background and the regularity of your practice.
Conclusion
Android development for beginners starts with a working toolchain, one language, and a small project. Install Android Studio, understand the basic project folders, create a simple screen, run it on an emulator, and use Logcat when something fails.
After that first success, grow gradually into lifecycle behavior, navigation, storage, networking, testing, accessibility, and release preparation. Current official documentation is a better source for changing setup steps than an old screenshot-based tutorial.
Getting Started
First of all, you need to install the Android app development software. So, you need the Android Studio IDE (Integrated Development Environment). So, just click on Download Android Studio.
After download, simply install it. This will recommend all those things whatever your system needs for the Android Studio setup.
So, follow all the recommended steps of Android Studio instructions.
Now, you are a beginner. So I'll recommend, you should go there to learn all the basic features of the current version of Android Studio. So check it out the android app development course.
What is Android?
Android is an open-source, customizable mobile operating system created by Google for use on touchscreen devices.
It’s the most popular operating system in use today. While mainly installed on smartphones, it is also in use on other smart devices such as TVs and watches.
Getting started with Android development
Now, I am going to tell you something very interesting. Yes, as you can see here is a simple "Hello World" program for you.
So, follow these steps and learn android programming step by step.
Androidmanifest.xml:
<?xml version="1.0" encoding="utf-8"?>
<manifest xmlns:android="http://schemas.android.com/apk/res/android"
    package="com.legendblogs.demo">
    <application
        android:allowBackup="true"
        android:icon="@mipmap/ic_launcher"
        android:label="@string/app_name"
        android:supportsRtl="true"
        android:theme="@style/AppTheme">
        <activity android:name="com.legendblogs.demo.MainActivity">
            <intent-filter>
                <action android:name="android.intent.action.MAIN" />
                <category android:name="android.intent.category.LAUNCHER" />
            </intent-filter>
        </activity>
    </application>
</manifest>
R.layout.activity_main refers to the activity_main.xml file located in the res/layout folder.
How to Start a Blog in 2020 (Beginner’s Guide)
activity_main.xml:
<?xml version="1.0" encoding="utf-8"?>
<RelativeLayout xmlns:android="http://schemas.android.com/apk/res/android"
    xmlns:tools="http://schemas.android.com/tools"
    android:layout_width="match_parent"
    android:layout_height="match_parent"
    tools:context="com.legendblogs.demo.MainActivity">
    <TextView
        android:layout_width="wrap_content"
        android:layout_height="wrap_content"
        android:textAppearance="?android:attr/textAppearanceLarge"
        android:text="Hello World!"
        android:id="@+id/textView"
        android:layout_marginTop="91dp"
        android:layout_alignParentTop="true"
        android:layout_centerHorizontal="true" />
    <Button
        style="?android:attr/buttonStyleSmall"
        android:layout_width="wrap_content"
        android:layout_height="wrap_content"
        android:text="Click me"
        android:id="@+id/button"
        android:layout_marginTop="48dp"
        android:layout_below="@+id/textView"
        android:layout_centerHorizontal="true" />
</RelativeLayout>
strings.xml:
<resources>
    <string name="app_name">Legend Blogs Hello world</string>
</resources>
The main activity code is a Java file MainActivity.java.
Android get public ip address programmatically
MainActivity.java:
package com.legendblogs.demo;
import android.content.Context;
import android.support.v7.app.AppCompatActivity;
import android.os.Bundle;
import android.view.View;
import android.widget.Button;
import android.widget.Toast;
public class MainActivity extends AppCompatActivity {
    private Context context;
    @Override
    protected void onCreate(Bundle savedInstanceState) {
        super.onCreate(savedInstanceState);
        setContentView(R.layout.activity_main);
        this.context = this;
        Button button_toast = (Button) findViewById(R.id.button);
        button_toast.setOnClickListener(new View.OnClickListener() {
            @Override
            public void onClick(View v) {
                Toast.makeText(context,"Welcome to Android Programming",Toast.LENGTH_SHORT).show();
            }
        });
    }
}
These are all the basic files. By using these files you can start your android app development.
Cheers.



Write a comment