When you need to start another activity in an Android application, the usual solution is an explicit Intent. The Intent identifies the destination Activity, and startActivity() asks Android to place that screen on the task back stack.
This guide updates the original two-screen example with clearer Java code, manifest registration, Intent extras, back navigation, Activity results, and common troubleshooting steps. It also explains why starting the first Activity again is often different from simply returning to it.
1. Understand Activity navigation
1.1 What an Activity represents
An Activity is a screen-level component that provides a user interface and handles interaction for a particular part of an application. A small application may have a main screen, a details screen, a settings screen, and a form screen, each represented by an Activity or another navigation component.
Moving from one screen to another does not mean copying the layout into the current class. Instead, Android creates or reuses the destination component according to the Intent and task rules declared by the application.
1.2 Explicit and implicit Intents
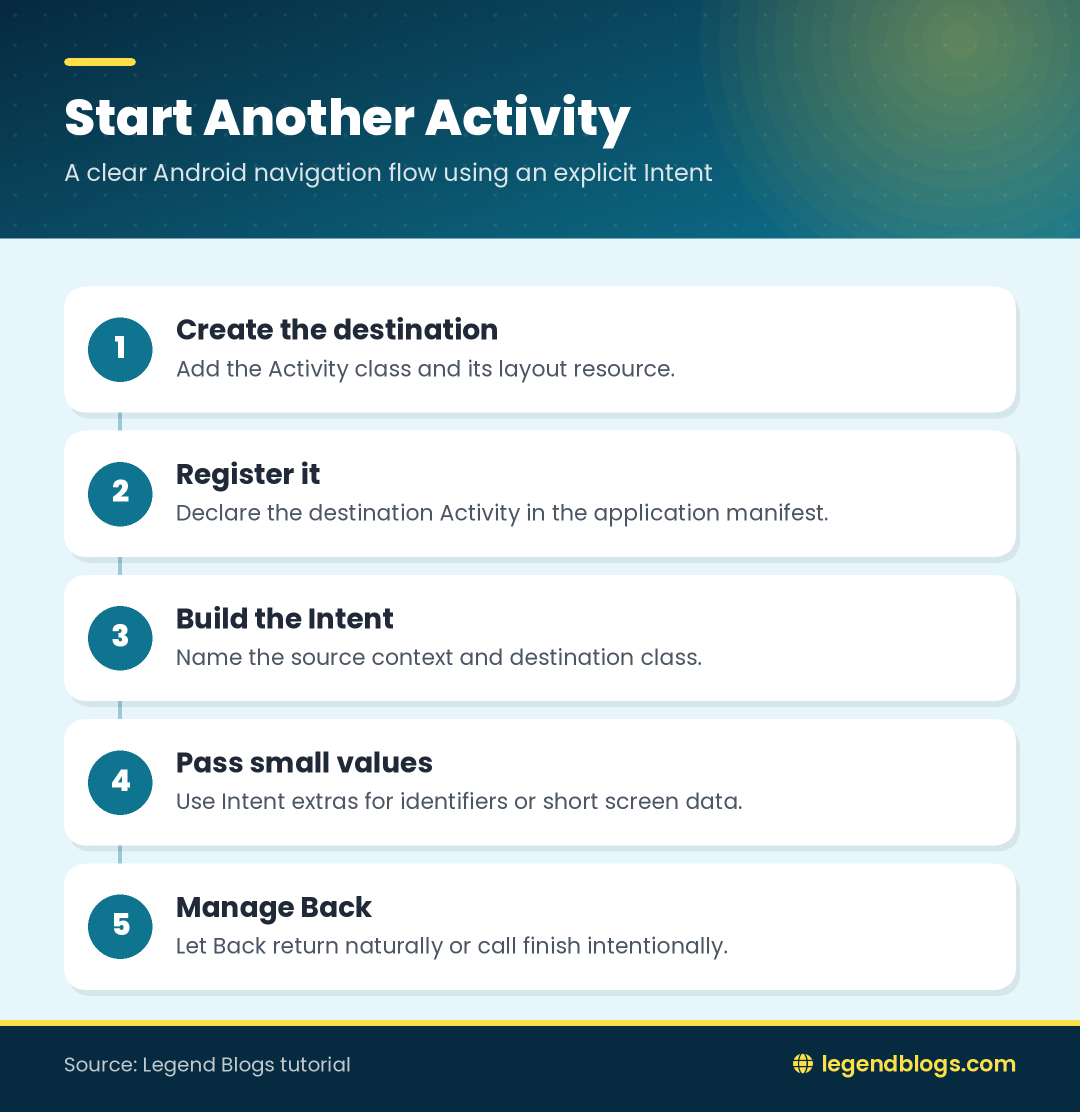
An explicit Intent names a destination class in your application. It is the appropriate choice when a button in MainActivity should open SecondActivity.
An implicit Intent describes an action without naming one specific class. It can ask another application to open a web address, share text, or select a file. This tutorial focuses on explicit navigation inside the same application.
- Use an explicit Intent for a known Activity in your app.
- Use an implicit Intent when Android should find a suitable application.
- Keep navigation decisions close to the event that starts the transition.
2. Create the destination Activity
2.1 Choose a clear class name
Create a Java class such as SecondActivity. Avoid names with underscores when a normal class name communicates the same meaning. Consistent names make manifest entries, stack traces, and code references easier to understand.
public class SecondActivity extends AppCompatActivity {
    @Override
    protected void onCreate(Bundle savedInstanceState) {
        super.onCreate(savedInstanceState);
        setContentView(R.layout.activity_second);
    }
}
The parent class should match the rest of the project. A project using AndroidX AppCompat commonly extends AppCompatActivity; an older project may still use the support-library equivalent.
2.2 Add a layout for the new screen
Create a layout resource such as activity_second.xml. The layout can contain a message, a form, a list, or any other views required by the destination screen.
<LinearLayout xmlns:android="http://schemas.android.com/apk/res/android"
    android:layout_width="match_parent"
    android:layout_height="match_parent"
    android:orientation="vertical"
    android:padding="24dp">

    <TextView
        android:id="@+id/title"
        android:layout_width="wrap_content"
        android:layout_height="wrap_content"
        android:text="Second screen" />
</LinearLayout>
Keep the layout name and the call to setContentView() synchronized. A correct Java class cannot display the expected screen if it inflates a missing or incorrect layout.
3. Register the Activity in the manifest
3.1 Declare a regular Activity
Every Activity that Android may create must be declared in the application manifest unless the project configuration supplies the declaration through another supported mechanism. A regular destination Activity does not need the launcher intent filter:
<application
    android:theme="@style/AppTheme">

    <activity android:name=".MainActivity">
        <intent-filter>
            <action android:name="android.intent.action.MAIN" />
            <category android:name="android.intent.category.LAUNCHER" />
        </intent-filter>
    </activity>

    <activity android:name=".SecondActivity" />
</application>
The launcher filter belongs on the Activity that should appear when the application starts. Adding it to every screen can make the application entry point ambiguous and is not needed for ordinary in-app navigation.
3.2 Avoid unnecessary configuration overrides
The original sample uses configChanges for orientation and screen size. That attribute changes how configuration changes are handled and should not be added merely to make navigation work. Let Android recreate the Activity unless the application has a specific, tested reason to handle the change itself.
4. Start another Activity with an explicit Intent
4.1 Build the Intent
Inside the source Activity, create an Intent with the current context and destination class:
Intent intent = new Intent(MainActivity.this, SecondActivity.class);
startActivity(intent);
The first argument identifies the context that starts the navigation. The second identifies the Activity Android should launch. This is the basic answer when you need to open another Activity in the same application.
4.2 Start the Activity from a button
A complete click listener can look like this:
Button openButton = findViewById(R.id.open_button);
openButton.setOnClickListener(new View.OnClickListener() {
    @Override
    public void onClick(View view) {
        Intent intent = new Intent(MainActivity.this,
                SecondActivity.class);
        startActivity(intent);
    }
});
Call setContentView() before findViewById(). If the button belongs to another layout, the lookup will return null or the application will fail when the listener is attached.
5. Pass data with Intent extras
5.1 Add values to the Intent
An Intent can carry small values needed by the destination screen. Give each value a stable key:
Intent intent = new Intent(MainActivity.this, SecondActivity.class);
intent.putExtra("ACTION_NAME", "Sample parameter");
intent.putExtra("ITEM_ID", 42);
startActivity(intent);
Prefer constants for keys in a real application so the sending and receiving classes do not depend on duplicated string literals. Keep the payload limited to values appropriate for an Intent rather than placing a large object or an entire data set inside it.
5.2 Read extras in the destination
Read the values from the Intent in onCreate():
Intent intent = getIntent();
String actionName = intent.getStringExtra("ACTION_NAME");
int itemId = intent.getIntExtra("ITEM_ID", -1);

if (actionName != null) {
    titleView.setText(actionName);
}
Always provide a sensible default for primitive values and handle missing strings. A destination Activity may be opened from more than one place in the future, so it should not assume that every caller supplied every extra.
6. Send larger or structured data carefully
6.1 Pass an identifier instead of a large object
If the second screen needs a product, user, or article, pass its identifier and load the current record from the application's data layer. This keeps the Intent small and avoids displaying a stale copy of a large object.
Small structured values can use supported parcelable or serializable types, but those mechanisms still have overhead and platform limits. Use them deliberately and document the contract between the two Activities.
6.2 Validate input at the destination
Extras are input to the destination screen. Validate identifiers, check permissions, and handle missing records before rendering the main content. A screen should fail gracefully when an Intent is malformed or an item has been removed.
7. Understand the Activity back stack
7.1 Return with the system Back action
When SecondActivity is started normally, Android places it above MainActivity in the task. Pressing Back usually finishes SecondActivity and reveals the previous screen. This is different from creating a new MainActivity instance.
7.2 Use finish() when the previous screen should not remain
After a successful login or a one-way setup screen, you may not want the user to return to the previous Activity. In that case, start the next screen and call finish() on the current one:
startActivity(new Intent(this, HomeActivity.class));
finish();
Use this intentionally. Calling finish() changes Back behavior and may prevent the user from returning to data they still expected to edit.
7.3 Do not restart the first Activity just to go back
The original example starts MainActivity again from SecondActivity's button. That creates another Activity instance unless task flags or launch modes change the behavior. For ordinary backward navigation, call finish() on the current screen or let the system Back action handle it.
8. Return a result from another Activity
8.1 Use a result when the caller needs a response
A form or selection screen may need to send a value back to its caller. Modern Android projects commonly use an Activity Result API contract rather than relying on older request-code callbacks. The exact contract depends on the type of result, such as selected content or returned data.
The key design is that the caller registers a result callback and the destination finishes with an appropriate result. This keeps the response tied to the Activity that launched the operation.
8.2 Keep navigation and data ownership separate
Use the result for a small outcome, such as a selected identifier or completion flag. If several screens need to observe the same changing data, use a repository or shared state holder rather than passing repeated snapshots through a chain of Activities.
9. Modernize the original Android example
9.1 Replace legacy imports and casts
The original code imports the old support library and casts the result of findViewById(). A current project may use AndroidX and generic view lookup, but the correct choice depends on the project's configured dependencies and Java or Kotlin version.
Update the project consistently rather than changing one import in isolation. A destination Activity, its theme, and its support libraries must remain compatible.
9.2 Use stable IDs and avoid unnecessary context fields
The original MainActivity stores a separate Context field even though the Activity already is a Context. Use MainActivity.this inside an anonymous listener or this where the receiver is the Activity. Give buttons distinct IDs if a layout contains more than one action.
10. Troubleshoot Activity navigation
10.1 ActivityNotFoundException
If Android cannot find the destination, check the manifest declaration, package name, class name, and spelling. A class that compiles can still fail at runtime when the manifest points to a different package.
10.2 The destination opens but data is missing
Check that the sender uses the same key that the receiver reads. Verify the extra type and provide defaults for optional values. Log the identifier or state needed for diagnosis, but avoid logging private data.
10.3 The screen opens repeatedly
Inspect click listeners, lifecycle callbacks, and code that starts navigation after configuration changes. Disable the button briefly or guard repeated events when a user action can be delivered more than once.
FAQ
How do I open another Activity in Android?
Create an explicit Intent with the current Activity and destination class, then pass it to startActivity(). Make sure the destination Activity is declared in the manifest.
What is an explicit Intent?
An explicit Intent names the exact component Android should start, such as SecondActivity. It is commonly used for navigation between screens in the same application.
How do I pass data between Activities?
Put small values into Intent extras with putExtra(), then retrieve them with matching getter methods in the destination Activity. Validate missing or invalid values.
Why does Android say the Activity cannot be found?
The destination may be missing from the manifest, or its fully qualified class name may be wrong. Check the package declaration and manifest entry together.
Should I call finish() after starting another Activity?
Call finish() only when the user should not return to the current screen, such as after completing a one-way setup step. For ordinary navigation, leave the current Activity on the back stack.
Conclusion
To start another Activity in Android, create an explicit Intent, identify the destination class, and call startActivity() after the current layout is ready. Register the destination in the manifest and pass only the small values it needs through Intent extras.
Good navigation also means managing the back stack deliberately. Let Back return to the previous screen, use finish() when a screen should be removed, and choose a result or shared data approach when the destination needs to communicate back.





Write a comment