Android screen density affects how large interface elements appear on different devices. A phone, tablet, emulator, and desktop-sized Android device can use different pixel densities even when they display the same layout dimensions. If your code needs to inspect that density, the Android framework exposes the information through DisplayMetrics.
This guide explains how to read Android screen density programmatically, how to interpret the returned values, and when the value is useful. It also shows Java and Kotlin examples, explains density-independent pixels, and covers mistakes that can produce layouts that look correct on one device but fail on another.
What Android Screen Density Means
Density is not the same as screen size
Screen size describes the physical or logical dimensions of a display. Density describes how many physical pixels Android uses to represent a density-independent unit. Two devices can have similar screen sizes but different density values, so an application should not use raw pixels as its primary layout measurement.
Android uses density-independent pixels, commonly called dp, for layout dimensions. Text sizes use scale-independent pixels, or sp. The system converts those units into physical pixels according to the current display configuration.
Density buckets
Android groups common density ranges into buckets. The traditional bucket names include low density, medium density, high density, extra-high density, extra-extra-high density, and extra-extra-extra-high density. These names help developers organize drawable resources and reason about display scaling.
The value returned by DisplayMetrics.density is a scale factor rather than a label. A value near 1.0 represents the baseline medium-density scale, while larger values represent more pixels for the same dp measurement. The exact value should be read from the device instead of assumed from its model name.
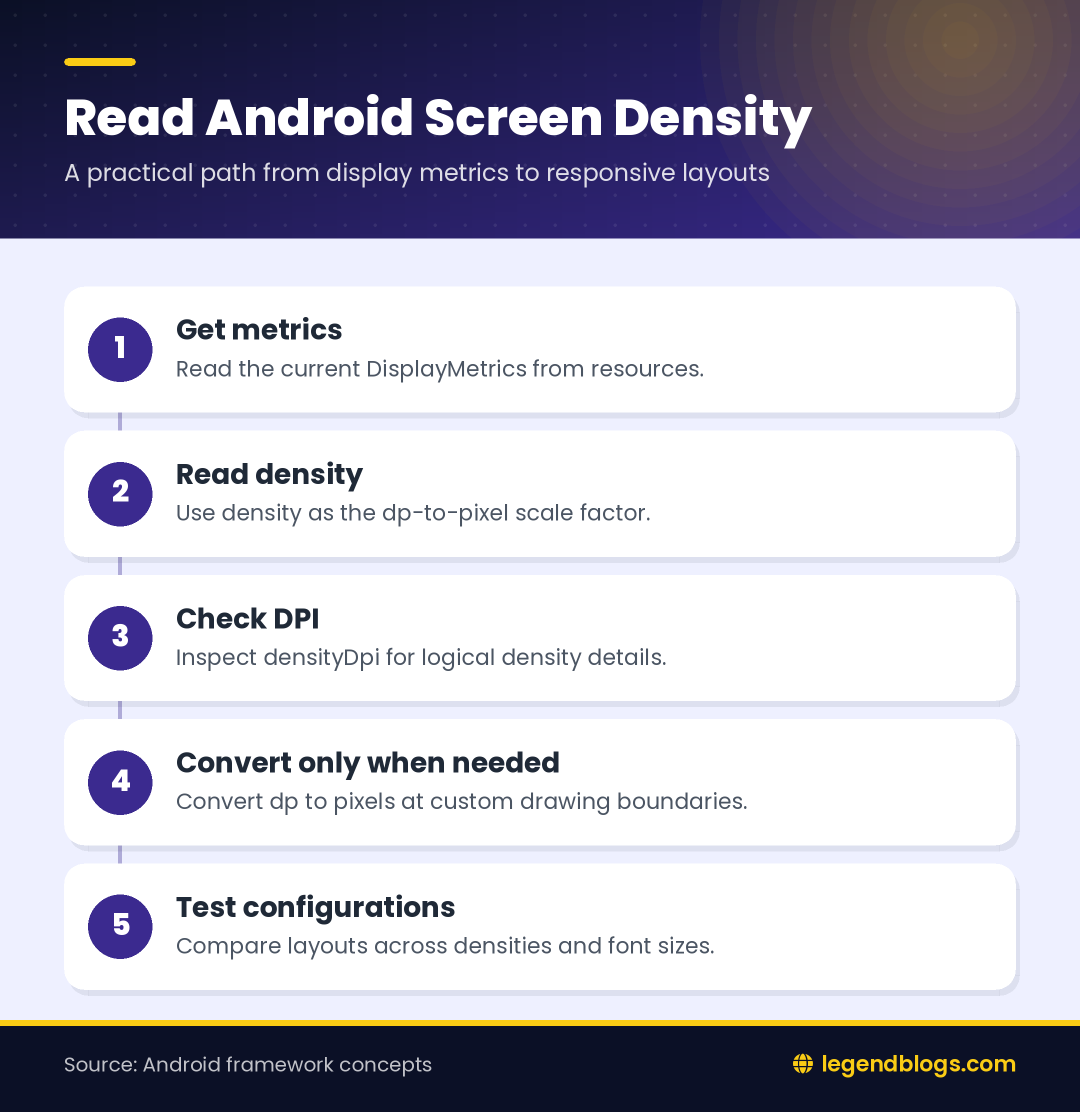
How to Read Android Screen Density
Use the current resource configuration
The simplest approach is to obtain the display metrics from the current resources object. In an Activity, Fragment, custom View, or other context-aware component, the resources object describes the configuration currently used by that component.
DisplayMetrics metrics = getResources().getDisplayMetrics();
float density = metrics.density;
The density variable is a floating-point scale factor. Do not round it before using it for a conversion, because rounding can introduce visible measurement errors in custom drawing and image placement.
Read the density DPI value
If you need the density bucket value, read densityDpi. It is an integer representation of the logical density used by the current display configuration.
DisplayMetrics metrics = getResources().getDisplayMetrics();
int densityDpi = metrics.densityDpi;
The DPI-style value is useful when selecting resources or logging device configuration. It is not a guarantee of the display's measured physical dots per inch. Treat it as Android's logical density setting for resource and layout scaling.
Get the Screen Density in an Activity
Java example
In a Java Activity, call getResources().getDisplayMetrics(). The result can be inspected during initialization or whenever your code needs the current configuration.
import android.os.Bundle;
import android.util.DisplayMetrics;
import android.util.Log;

import androidx.appcompat.app.AppCompatActivity;

public class MainActivity extends AppCompatActivity {
    @Override
    protected void onCreate(Bundle savedInstanceState) {
        super.onCreate(savedInstanceState);
        setContentView(R.layout.activity_main);

        DisplayMetrics metrics = getResources().getDisplayMetrics();
        float density = metrics.density;
        int densityDpi = metrics.densityDpi;

        Log.d("DisplayInfo", "density: " + density);
        Log.d("DisplayInfo", "densityDpi: " + densityDpi);
    }
}
This example logs the values without changing the user interface. Logging is a good first step when diagnosing a device-specific layout issue because it lets you compare configurations without hard-coding a device name.
Kotlin example
The same information is available in Kotlin. Kotlin's property syntax makes the calls shorter, but the underlying Android APIs are the same.
val metrics = resources.displayMetrics
val density = metrics.density
val densityDpi = metrics.densityDpi

Log.d("DisplayInfo", "density: $density")
Log.d("DisplayInfo", "densityDpi: $densityDpi")
When the code runs in a Fragment, use the Fragment's context or resources after the Fragment has been attached. Avoid accessing a nullable context before attachment; the density lookup itself is simple, but the lifecycle surrounding it still matters.
Read the Density Bucket Safely
Use Android constants instead of comparing only labels
Android provides constants such as DENSITY_LOW, DENSITY_MEDIUM, DENSITY_HIGH, and higher-density constants in DisplayMetrics. These constants make intent clearer when your code must classify a configuration.
int dpi = getResources().getDisplayMetrics().densityDpi;

if (dpi == DisplayMetrics.DENSITY_MEDIUM) {
    Log.d("DisplayInfo", "Medium density");
} else if (dpi >= DisplayMetrics.DENSITY_XHIGH) {
    Log.d("DisplayInfo", "Extra-high density or greater");
}
Do not assume every device will match only one familiar bucket. Modern devices and user settings can expose intermediate or adjusted values. If your goal is layout sizing, use dp and sp rather than branching on density names.
Use a readable helper method
A small helper can keep diagnostic code out of your Activity. It can return the scale factor when drawing, or return a formatted description when writing logs.
public static float getScreenDensity(Context context) {
    return context.getResources().getDisplayMetrics().density;
}
Pass a suitable Context rather than storing an Activity reference in a long-lived object. An application context is sufficient for the resources lookup when you do not need an Activity-specific theme.
Convert Density into Display Information
Convert dp to pixels
When a custom drawing API requires pixels, convert from dp at the boundary of your code. Keep the rest of the application expressed in dp so that the same design dimension scales consistently.
float dp = 24f;
float pixels = dp * getResources().getDisplayMetrics().density;
For an integer pixel value, use a deliberate rounding operation rather than a cast that always truncates the fractional part.
int pixels = Math.round(dp * getResources().getDisplayMetrics().density);The reverse conversion divides pixels by the density. It is useful when a touch coordinate or measured canvas value must be displayed as a logical dp value.
float pixels = 96f;
float dp = pixels / getResources().getDisplayMetrics().density;
Use framework resources where possible
For ordinary layouts, define dimensions in resource XML rather than converting them manually. A dimension such as 24dp gives Android enough information to perform the conversion for the current configuration and keeps the design value visible to other developers.
Manual conversion is most appropriate for custom drawing, dynamically generated content, charts, canvas coordinates, and APIs that explicitly require physical pixels. Repeated conversions throughout business logic usually indicate that a value belongs in a layout or dimension resource instead.
Use Screen Density in Custom Views
Prepare drawing values once
A custom View can calculate frequently used dimensions when it is created or when its configuration changes. Converting the same dp value during every draw pass adds unnecessary work and makes the drawing code harder to read.
public class GridView extends View {
    private final float lineWidth;

    public GridView(Context context, AttributeSet attrs) {
        super(context, attrs);
        float density = getResources().getDisplayMetrics().density;
        lineWidth = Math.max(1f, 1f * density);
    }
}
The example keeps the source dimension in dp and stores the converted value for drawing. If the display configuration can change while the View remains alive, recalculate configuration-dependent values when appropriate.
Scale images and touch targets carefully
Images should normally be placed in density-qualified resource directories or loaded through Android resource APIs. This allows the platform to choose an appropriate asset. Scaling every bitmap manually from a raw pixel size can make images blurry or consume more memory than necessary.
Touch targets also need logical sizing. A button that is physically comfortable on one density may be too small on another if its size is specified only in pixels. Use dp for the target's layout size and use density information only when an API requires a pixel value.
Common Android Density Mistakes
Confusing density with resolution
Resolution is the number of pixels in a display dimension. Density is the scale used by Android to map logical dimensions to pixels. A higher-resolution display does not automatically mean that every layout should become larger or that you should use more raw pixels.
Assuming one device value is universal
Testing on one phone can hide problems caused by another density, font scale, window size, or display setting. Test layouts at multiple densities and use Android's preview and emulator configurations to find hard-coded measurements.
Using density to solve every layout problem
Density is not a substitute for responsive layout design. Constraint-based layouts, resource qualifiers, flexible containers, and proper text measurement are usually better solutions than adding many density-specific conditionals.
Configuration and Testing Notes
Account for user and system changes
Display configuration can be affected by system settings, window configuration, and user preferences. Code that caches a density value for the entire process may become stale if the relevant configuration changes. Re-read metrics when your component receives a configuration update or is recreated.
Test the value and the visual result
When debugging, log both density and densityDpi, then inspect the actual layout. A correct metric does not guarantee a correct interface if a drawable has the wrong intrinsic size or a text view is constrained incorrectly.
- Test at least one low or medium-density configuration and one high-density configuration.
- Check portrait and landscape layouts where dimensions depend on available width.
- Test increased font size separately from display density.
- Inspect custom canvas drawing at fractional density values.
Java and Kotlin Compatibility Notes
Choose the API that matches the job
Use DisplayMetrics when you need the current density scale or density DPI. Use resource dimensions when the value belongs to the user interface. Use window and configuration APIs when the actual problem concerns available window size rather than density.
Keep measurement code easy to replace
Putting the lookup behind a small helper or measurement class makes it easier to test. It also prevents unrelated application code from depending directly on an Activity, which is useful when the same calculation is needed by a custom View, service, or test.
FAQ
How do I get Android screen density programmatically?
Call getResources().getDisplayMetrics() and read its density property. The result is a floating-point scale factor used to convert dp values into pixels.
What is the difference between density and density DPI?
density is a scale factor, while densityDpi is an integer logical density value used by Android's resource and configuration system. Both describe the current logical display density in different forms.
How do I convert dp to pixels?
Multiply the dp value by DisplayMetrics.density. Use Math.round() when an integer pixel measurement is required.
Should I use pixels directly in an Android layout?
Usually not. Use dp for layout dimensions and sp for text. Convert to pixels only at an API boundary such as custom canvas drawing that explicitly works in pixels.
Can screen density change while an app is running?
The relevant display or configuration can change while an app is active. Components that cache metrics should respond to configuration changes or obtain fresh metrics when they are recreated.
Conclusion
You can get Android screen density programmatically with DisplayMetrics. Read density when you need the conversion scale and densityDpi when you need the logical DPI-style configuration value.
For reliable interfaces, use the information to support custom drawing and diagnostics rather than replacing responsive layouts with device-specific conditions. Keep dimensions in dp, text in sp, test across configurations, and convert to pixels only where the Android API requires it.




Write a comment